Pages

Thursday, November 7, 2024

Re-sharing my Dissent Collar pattern


The only techniques used in this pattern are ring, chain, reverse work, picot, join, and lock join. 

Tat the top row across first, shown in gray on the diagram. Then continue tatting down and up for each narrow section. The picots between the narrow sections need to be gradually larger to enable the sections to fan out nicely.

I made mine using size 10 thread, but since this collar is worn like a necklace, the size doesn't really matter.


Top row and first section in progress

Beads can be added inside the top rings.
I'm using 6mm beads with size 10 thread in the photo above.


My tatting pattern was inspired by seeing a picture of RBG's dissent collar. ♥

Ruth Bader Ginsburg


Wednesday, October 30, 2024

Leaves of Lace Garland is finished


"Leaves of Lace Garland" by Marilee Rockley 2024

My leaf project is done! 

I'm quite happy with the results, and since I'm already a subscriber to Fiber Art Now magazine I've gone so far as to sign up for a CaFÉ account so that I can enter my fiber art into exhibitions. Maybe this will give me incentive to do more larger "art" pieces.☺ Of course, we know that all tatting is an art (not lost!) 

Details: There are a total of 32 tatted leaves in this garland. I started with a vintage leaf pattern and modified it to make leaves of varying sizes, adding an edge to the branch end of each leaf so that they could be joined together later. All of the leaves are in size 20 thread, using Lizbeth, Flora, and my own hand dyed to get a variety of colors.


To join the leaves together I chose a dark charcoal gray thread, and tatted 2 rows of chains only, the first row to connect the leaves, and the 2nd row to stabilize the arrangement. The leaves are still free to "flutter". No stiffening was added to them, but my lace is quite firm as I naturally tat tightly.


I made a clasp of polymer clay in a branch and leaf shape to finish the garland.


Friday, October 18, 2024

Progress on the leaf necklace


Having completed tatting enough lace leaves (despite being interrupted several times by more urgent matters) I was faced with the question of how to join them all together. One of those creator's block moments. Fortunately, I had some reject leaves left over to practice joining ideas on, which besides giving me an idea of stitch counts showed that green was not the color thread I wanted. Dark charcoal gray shows off the leaves much better! Similar to tree bark from a distance.


This is still a work in progress. I missed the deadline for a juried fiber art exhibit that I had planned to submit to, but there will be others. 

The leaf pattern is vintage, though I tweaked it a little to make different sizes. More about the leaf pattern on this post.


Monday, October 14, 2024

The Winner


The winner is "Glass Half Mindful" - please email me at yarnplayer (at) yahoo (dot) com (There wasn't a way to reach you at your blogger profile.)

It was wonderful reading all of the beautiful comments that were posted! So many acts of kindness happening, you all are making the world a better place! Thank you, Thank you!!!

By the way, I didn't include the one commenter who asked to not be included so that's why I put 1  to 31 in the number spinner instead of 32.


Sunday, October 6, 2024

Random Act of Kindness Giveaway


 To be entered in this giveaway drawing, you need to do 2 things: 
Leave a comment on this post, and do something nice for someone. The world needs more kindness. ♥

The prize package includes:

a rare out-of-print book Minitats by Patti Duff, 

a Japanese tatting pattern book (containing diagrams and excellent photographs),

a tatted necklace and earring set (handmade by me) in my own "Loopy" pattern,

a bobbin lace bookmark (handmade by me) in a pattern by GaliciaBee,

an assortment of my own hand dyed thread!

Readers of this blog from outside of the U.S.A. are welcome to enter this giveaway - but - be aware that even though I'll mark the package as gift, sometimes customs fees may still be charged, unfortunately. (It has happened before.)

I'll chose one winner at random on Monday, October 14. Please be sure there's a way for me to contact you if you win, either a blog I.D. or an email address. And, don't forget to do something nice for someone!


Saturday, August 17, 2024

Dark Matter hand dyed thread


This "Dark Matter" thread batch was inspired while touring the Yerkes Observatory recently. Dark matter is described on the NASA science web page as a mysterious substance that "doesn’t reflect, absorb, or radiate light – at least not enough for us to detect yet."

My new hand dyed thread is only my fun attempt to give the effect of "outer space" colors. ☺ Now listed for sale in my Etsy shop.

Here's some pictures I took of the telescope and observatory building, which was built in 1897. Learn more at the Yerkes Observatory website.


Monday, August 5, 2024

The tatted leaf project in progress


What I've got so far. I'm not sure about adding that stone. Actually, looking at it today I'm thinking it doesn't work with the leaves at all. Apparently this project is becoming an artsy necklace. So, I'll tat more leaves! I do like the colors.

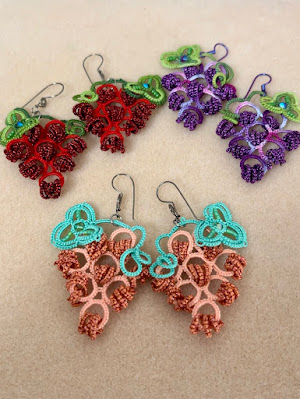
I did finish the "grape" "raspberry" "coral" earring projects that I had mentioned in a previous post, so here's some pictures of that:


Friday, July 19, 2024

Leaves from vintage pattern


The pattern is vintage and in the public domain. It's in the Priscilla Tatting Book number 3, and is a free download found on the Antique Pattern Library website https://www.antiquepatternlibrary.org/html/warm/tatting.htm scroll down and look for a green cover. Also found in a House of White Birches tatting book number 5.

The pattern is quite easy to vary in size once the basic pattern is understood.

I began making these a few days ago as "comfort tatting". I don't know how else to explain it. I don't have a predetermined plan in mind but something usually occurs once I have a collection to look at.


Tuesday, July 2, 2024

Like the Grape Earrings except Raspberry?


Earrings like the "Grape" ones are quite a bit of extra work, but the results really "pop"! This is not my design. It's found in the Italian magazine IL MIO Chiacchierino October/November 2014. I bought my copy from Handy Hands Tatting. 


I do the base rings a little differently than described in the magazine. I use a self-closing mock ring with "floating" rings thrown off from it, so there are only 2 sets of tails to sew in.


For the coils I like Liz Metallic thread. Each coil is a long chain. What I do is start the chain on a paper clip, tat the long chain and leave tails long enough to tie. Remove the paper clip, sew 1 tail through the space left by the paper clip, then tie the 2 ends together with a double knot. I prefer to cut the tails leaving a little bit sticking out, apply some glue, and then let it dry. After that cut the tails very short and then use a crochet hook or small latch hook to pull the knot inside the coil to hide it.


This project is still in progress. The "leaf" at the top is added last. My notes on the first pair of "grape" earrings are in this post from 2019.

Saturday, June 15, 2024

Free Watermelon Tatting Pattern


Slice of watermelon tatting design by Marilee Rockley

It's a slice of watermelon! Well, sort of, at least the best I could do for now. The pattern is a free download!  Click here.

I used size 10 thread with size 11/0 Toho seed beads for my sample, which measures 2 and 3/8" (6 cm) at the widest part.

I'm working on some video demos to post on TikTok, expecting to edit them down later into YouTube shorts. The trickiest part is the green "rind" which is done in pearl tatting technique.

Let me know if anything doesn't make sense in the pattern. Or, if it looks like a different object entirely! Somehow, looking at it now, I'm thinking UFO (unidentified flying object), lol.☺

Oh well, I really was trying for watermelon.


Saturday, May 18, 2024

Split chain in shuttle tatting


For YouTube I made a demo of how I do a split chain. The project that I'm working on in the video is "Steampunk Belt" which has 1 split chain in the pattern.


Friday, May 10, 2024

Hand dyed thread "Pansy"


New hand dyed batch of "Pansy" just listed in my Etsy shop.

The Pansy flowers that inspired the thread.


Tuesday, May 7, 2024

Steampunk style belt tatting pattern


The pattern is finally done! Really, I had forgotten all about it until someone showed me a picture from my post in 2014 and asked to buy the pattern. Well it is finished now and is listed in my Etsy shop here. The details are in the listing description.

The size 3 thread makes quite a bold and sturdy eye-catching accessory. I'm sure finer threads could be used for a more delicate lace (with smaller buttons, beads and ribbons to correspond) but I have not tried it. I like the "wow" of the big belt, and yes, it is sturdy, due to the central joining picots set at an angle. The end ribbons tie like a sash with a bow in back, so the belt is one size fits all.


The shank buttons are purely decorative and serve no practical function except to look "steampunk". Note: they really do need to be "shank" buttons for this project (not buttons with holes). There are loads of "steampunk shank buttons" offered for sale on the Internet. Please do not ask me where I bought mine - it was 10 years ago!


Saturday, April 6, 2024

Swords Into Plowshares


The "Swords Into Plowshares" necklace is one of my more difficult tatting patterns, including the technique of using 2 half stitches to turn a chain so that floating rings form on both sides. Actually, that would work well for making leaf shapes, also!

It has been so long since I made this pattern that I made a mistake putting the flower in the center, but then I decided that I liked it! It's a nice variation. But, I have not added the variation to the pattern, oh gosh, no! 
However, the necklace is in my Etsy shop. The Swords Into Plowshares pattern is also on Etsy.

Here's some snapshots from the short video that I posted on TikTok (and even shorter video that I posted on Instagram):


Another necklace is in progress, which is being tatted according to the pattern this time! Different colors, though. I got the idea for these colors from Van Gogh paintings of Irises.


Thursday, March 21, 2024

Pattern and video for a menorah in tatting


This design was developed from the branched candlestick photo on page 79 of the book "Tatting Techniques" by Elgiva Nicholls. Although there wasn't much description about it, I could see that the technique was branching encapsulation, so I went on from there.

It's a tricky project to explain, so I made a video. It's on YouTube at https://youtu.be/8mR94S5-GFk?si=0QxP-UdlDLNF1BSb

The PDF pattern is a free instant download from https://www.keepandshare.com/doc/8291924/menorah-pdf-785k?da=y

Please let me know if either of the links won't work!
I made this pattern as sort of a challenge to see if I could do it.☺ Another tatter was looking for a menorah pattern, so I helped search... and found nothing. Only a few rumors that somebody had tatted a menorah, but no pictures could be found online. Well, now there are pictures and video and a pattern.☺ It's a challenging project, though! Recommended for experienced tatters.


Thursday, March 7, 2024

The Winner!


The winner of the Spring Giveaway is Mary M. Congratulations, Mary! I'll be getting in contact with you to send you your prize!

Thank you to everyone for your wonderful comments! It was so heartwarming to read them and to know that folks still read this blog which has been going since 2007. ♥


Saturday, March 2, 2024

Spring Giveaway!


Giveaway!

Open to residents of the USA only (because of shipping costs).

To be entered in the giveaway, leave a comment on this blog post before Thursday, March 7, 2024.
I'll choose one winner on Thursday, March 7 and contact the winner (so please leave some contact info in your comment).

The prize is as shown, a box with a sampling of hand dyed threads in assorted sizes, picot gauge, some tiny crochet hooks, tatting shuttles, a small scissors, and the tatting book shown, which is written in Dutch (I think), with very clear diagrams of each pattern.

Thursday, February 29, 2024

Leap day wishing for Peace


Peace symbol in wire wrapping + tatting

Wishing for peace everywhere to everyone.  

The wire frame before tatting is described on my previous post.

For the center tatting I used 2 multicolored threads plus a green thread, in the encapsulation technique (unflipped double stitches over a multiple thread core). I have a short video on that here, but for this project I kept the flowers small, only 1 "petal" each.
The tiny "flowers" are Josephine rings tatted using the same half stitch repeated, along with an occasional normal ring.

I used only 2 threads, normal tatting in green for the "vine" around the edge. 8 Victorian sets of 2/2 between each Josephine ring. I usually use about 9 half stitches for each ring. 

For the outside edge I generally used the modified soumak weave with 28 gauge wire, changing to simple coiling when the base wires overlapped. I arranged the tatted "vine" around the edge and caught it in the wire occasionally. Some 2mm beads were also included for added texture.
 

This was quite a challenging project for me! More difficult than the usual wire-wrapped + tatting pendants that I've made before, because of the smaller spaces to work the wire into and trying to keep the symbol clear enough to be recognizable. But, I'm happy to have one done that I can wear, and to get more ideas from!