Saturday, December 7, 2019

A gift for you: Star Capella video and PDF pattern


Here's the link to my video demo: https://youtu.be/6CQSxeBsU-E

The link to download the PDF pattern: 
https://www.keepandshare.com/doc/8245543/star-capella-pendant-pdf-473k?da=y

The story behind this! 

First of all, I do not tat as fast as the video! The speed has been increased with video technology. In reality, it takes me 2 hours to complete one Star Capella motif. The video lasts about 25 minutes. I increased the speed on much of it and edited out boring parts as well as "bloopers".

I got the idea for this design by playing around with one of my previous free patterns, "2 Way Star". That one is still available from the "My Free Patterns" tab of my blog.

I've been watching some of the longer videos in other crafts while doing my fitness exercises at home. If there's something I really want to try making, I'll refer to it on my tablet or smartphone while making the project, pausing to complete the next step and then continuing the video to see what to do next.

So, I thought I could make a complete project video myself, and include the PDF with detailed instructions. Free because I haven't done any giveaways in a long time. Enjoy!

Saturday, November 30, 2019

Trying JTatter's 3D Tatting Platonic Solids

The very talented designer Yulia has an Etsy shop called JTatter, where she sells her unique tatting patterns and tutorials. Many are 3 dimensional and all are stunningly beautiful! I've tried a few of her Platonic Solids and it's making me feel like I'm learning the properties of geometry in a fun way!
Earrings I made from the Tetrahedron pattern by JTatter

Another pair of earrings using the Tetrahedron motif by JTatter

I enjoyed tatting this Icosahedron motif designed by JTatter

My project in Lizbeth metallic thread using JTatter's Platonic Solids tatting tutorial.

Friday, November 1, 2019

Pizazz, Kinetic, and Wire


A fresh batch of Pizazz hand dyed thread is done and listed on Etsy. It's satisfying to see how bright these colors are when dry, since they're darker when the wet dye is applied.
Leaf earrings using Pizazz thread, from the pattern Small Maple Leaf.

Earrings in hand dyed and Lizbeth Metallic from the pattern Kinetic.

I combined tatting with wire wrapping to make this mixed media pendant.
Playing around with more ideas!

Interested in the basic techniques I'm using for wire wrapped tatting pendants?
See my video on YouTube.


Friday, October 18, 2019

CMY Spectrum


I used the "CMY" primary colors: cyan, magenta, and yellow. If you buy printer ink, you'll recognize these as the printer's primaries. Because I wanted to choose the most accurate fiber reactive dye colors for this mix, I looked at the detailed information given on Paula Burch's website.


I needed to rinse out my brush for each color after applying the dye in order to keep the colors clear and bright. So, although only 3 colors were used (the secondary colors came about from the primaries overlapping) it was one of the trickiest batches I've ever done. The results were worth it, I think! They're listed in my Etsy Shop.

Wednesday, October 9, 2019

Primary colors

Apparently there's discussion these days about which colors are "Primary" colors. Some say the Red, Yellow, and Blue most of us learned in school are not as truly "Primary" (a group of colors from which all other colors can be obtained by mixing) as the Magenta, Yellow, and Cyan used in printer inks. I don't know how it'll work with dyes, but it's obvious that I'll have to do another batch with the other set of primaries next. Anyhow, a limited amount of the thread pictured above is listed in my Etsy shop.

I haven't tatted anything yet with this hand dyed, but here's some items I made in solid blue, red, and yellow:

Blue "Atom" pendant from my own pattern in Up and Tat 'Em

Red earrings from my "Grand Aura" pattern in Up and Tat 'Em

Yellow "Atom" from my own pattern in Up and Tat 'Em


Monday, September 30, 2019

"Lola" hand dyed purples

Going fast! This batch varies a bit from previous times I've dyed the same recipe, since there's not really a blue in it. I don't know why it is different; it could be the dye. But, I like it!

A previous "Lola" hand dyed is what I used to make the framework of grape earrings in a previous post. I was wanting to have them done by now, but they're not. I guess age is slowing me down!

I did manage to list some tatted jewelry in my Etsy shop though, here's examples:

Earrings from the Elegance pattern in Boutique Tatting changed up with silver plated spike beads.

Pendant tatted from the Rotation pattern. I finished it as a sliding knot necklace with matching nylon cord and micro-macrame details.

Monday, September 23, 2019

Grape Earrings from Italian Magazine

 This cluster of grapes earring design is a pattern in the Oct/Nov 2014 issue of the Italian magazine pictured below. I've finished one earring and have started on the 2nd one in the pair!

The pattern in the magazine is diagrammed and I also used the "Google Translate" app which worked with my smartphone's camera to translate the Italian text. It looked to me like the tatted rings were worked separately then sewn together in the original, but I decided to use a self-closing mock ring with "floating" rings thrown off from it to avoid some of the sewing.

I chose "Lizbeth Metallic" for the grape "berries". Each is a long tatted chain that is coiled around the previously tatted ring.


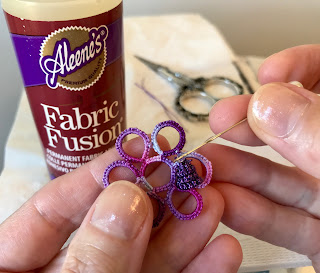
I tied the ends together. For these I did not try to sew in the tails, just snipped them off and added a drop of my currently favorite glue (Aleene's Fabric Fusion) using a pin. The pin is much easier to clean up than a brush! Simply wipe the pin with a paper napkin or tissue after applying the glue. 

After that hide the knot inside the coiled "berry".

The leaf and tendril at the top is added last. Since this is not my own pattern, I will not be posting any further details about it. It is in the magazine. I purchased my copy from Handy Hands Tatting and it's also available from other tatting supply shops.

Friday, August 23, 2019

The "Pod" in Micro-macrame Cord

An interesting local bead shop had a supply of S-Lon nylon micro-macrame cord in many appealing colors, so I couldn't resist buying a collection! I've always thought of tatting as a version of macrame anyway, since it is made of knots.

 The cord I used is .5mm thickness, comparable to a size 10 thread. It's slippery and stiff, so takes a bit of experience to get used to.

It takes a firm hand to get the knots tight. Occasionally I had trouble closing a ring because of the cord twisting and kinking. Being able to re-open a ring is a skill worth knowing!

Really nice how the 3-dimensional pod shape formed naturally with no blocking required.

 For the "fluff" inside the pod, I used white cord with large picots and 6 mm beads for the "seeds". Although I followed my original pattern for the pod, I made up a distinct filler variation.

 The finished object is waterproof. I sewed in tail ends and secured them with glue. I did try a "thread zapper" with a hot tip that melts the nylon, but that tool can instantly cut a project to ruin, and leaves a dark residue. I prefer sewing in ends and although I don't use glue on cotton, the slippery nylon does need glue to keep the ends from popping out.


 The finished pod strung onto a leather cord makes an "art to wear" necklace. Definitely different!


Wednesday, July 24, 2019

Hand Dyed Thread "Lantana Citrus"

 Hand dyed thread "Lantana Citrus", with colors inspired by Lantana flowers, is now listed in my Etsy shop.  Bright and tropical!


Monday, July 15, 2019

Flower Colors, Snowflakes and Crocheted Bracelet

 During a walk through the Boerner Botanical Gardens I came upon these pretty little flowers called Lantana "Landmark Citrus" in bright yellow, orange, and pink. Great combination for a batch of hand dyed thread, don't you think?
 I also liked the light yellow greens in this Hosta plant. I think I need a batch of greens like that, paler and more to the yellow side than my previous batches of "Celery" green.
 I finished tatting another Renulek snowflake (please see Renulek's Etsy Shop for her patterns) in an early sample of my own "Summit" hand dyed combined with a pale blue. (Summit sold out very quickly but it will return.☺)
 These snowflakes are all from Renulek patterns.

 As a break from tatting, I crocheted a bracelet from a pattern by Natalia Kononova. Her patterns are for sale at OutstandingCrochet.com  and also on Ravelry. The crochet thread is 3 ply linen (comparable to a size 10 cotton) which I purchased from YarnStories on Etsy.

The colors of my favorite baseball team and I'll wear it to the game!

Saturday, July 13, 2019

Supporting My Neighbors and Letting My Voice Be Heard

 These photos are from the Lights for Liberty vigil held at Milwaukee City Hall in Milwaukee, Wisconsin. In the selfie above, I'm on the left. I came with a friend, and for both of us it was our first time attending a protest rally of any kind. I went to this event because I believe all human beings have a right to life, liberty and dignity. More info on the Lights for Liberty website.  

Many inspiring, well-informed speakers. The sign in back says, "Not In Our Name", because we don't want our tax dollars being used to lock children in cages.

Close The Camps (the concentration camps)

More signs: "This Is Inhumane" and "Shame"

The speaker in the red shirt had been inside the detention camps, and he described the abuse and torture witnessed there.

To be clear, seeking asylum is LEGAL.

The crowd outside Milwaukee City Hall

Another view of the crowd at dusk. There was a minute of silence, with people holding candles or cell phone lights.

The front of the flyer given out with Milwaukee area action steps. Search online to see actions for your area.

The back side of the flyer. Any small action helps. You won't be one of those who stood idly by while witnessing injustice.