Thursday, December 30, 2021

Seaside colors coming in New Year


Mermaid vibes, perhaps? 

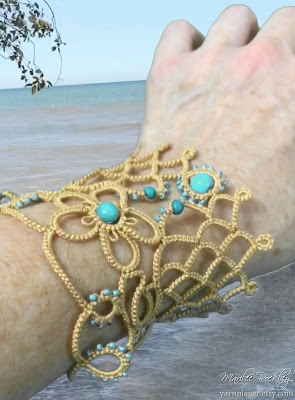
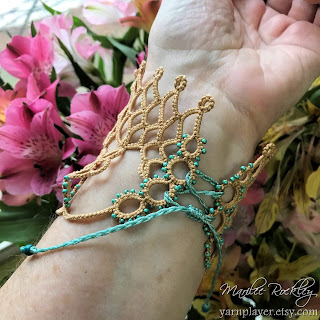
This is my "Fairest" bracelet pattern tatted in size 10 Lizbeth No.715 "Maple Butter" which I think makes a nice warm, sandy beach color. Paired with aqua colored beads, it reminds me of summer days. I took a green screen shot with my smartphone against a video of Lake Michigan taken last summer. (There's an app for that!)


For this bracelet I decided to use a sliding knot closure in nylon macramé cord, laced up corset style. In my Etsy listing there is a short video showing how to put on and tighten the sliding knot by yourself.

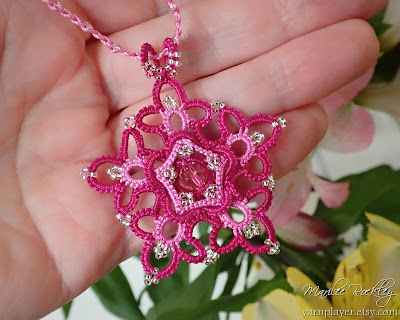
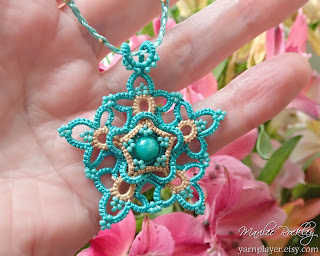
Also recently listed a Star Capella pendant in hand dyed aqua accented with some of the Lizbeth thread. 

A new hand dyed thread batch has occurred to me, and I'll be working on that within the next few days, to be listed in the new year! I'll probably call it "Seaside" since I already have a batch with beach in the title (Beach Café). My goal is to have it gently shading from aqua to a sandy beach color. We will see how it turns out!

Wishing you all a very happy New Year!  


Saturday, December 18, 2021

Tatted star in pink and knitting goes on


In 2 shades of pink from my stash of hand dyed threads, the "Star Capella" finished as a pendant. Actually the camera couldn't capture the true color of the darker pink, which is really a boysenberry shade. 


The sweater project is still in progress. I've finished the lacy edging on the right, and am at my second try of starting the left side, which is knitted from what I call the "back side" of the work. I've had to learn a new-to-me knitting technique called "purl 2 together through back loop" and it is even trickier than it sounds. I don't know why people carry on about tatting being hard - knitting is much harder, in my humble opinion - and I learned to knit much earlier in my life than I learned tatting.

Thursday, December 2, 2021

After several tries "Holly's Heart"


When I saw the original vintage photo on Ribbonwinners and the lovely pattern redesign by Lily Morales I decided to give it a try.


Although both the written pattern and diagrams are extremely well done, for some reason I just couldn't wrap my little brain around it enough to be able to follow it. I was ready to give up, but then took a look at the vintage original another way. 

The center is simply square blocks stacked up. 
They're turned at an angle to form the basic shape. 
Additional triangles fill in the gaps to make the heart shape. 

Since I do understand how to "climb out" using split rings, I decided to tat a row of blocks. And then "climbed out" to tat another row of blocks. I was able to finish the heart by taking a section at a time, in 3 sections. So, 3 sets of tails to sew in, not as clever as Lily's method which leaves only 1 set of tails, but I'm happy just to have been able to finish the heart! ♥

Tuesday, November 30, 2021

The winner of the "Goody Good Giveaway"


The winner is Julie! 

Thank you to everyone who entered, and I enjoyed reading your comments! Such fun! ♥

Tuesday, November 23, 2021

Goody Good Giveaway!


Giveaway!

This giveaway package includes:
  • An assortment of hand dyed thread
  • Tatted white collar 
  • Tatted red earrings 
  • Book "Artistry In Thread" by Helma Siepmann
To enter, leave one comment on this post. 
Be sure there's a way for me to contact you if you win, either a blog I.D. or an email address.

Readers of this blog from outside of the U.S.A. are welcome to enter this giveaway - but - please be aware that even though I'll mark the package as gift, sometimes customs fees may still be charged. 

I'll choose the winner on Tuesday, November 30, 2021 using a random number generator.

Wednesday, November 17, 2021

Tatting a Catherine Wheel Join from the back side


Here's the demo I did showing the tatting technique of the Catherine Wheel Join (CWJ) from the back side. 

The reason for doing it that way would be if the project was being tatted "front side, back side" and the CWJ was on the back side, and if you really wanted the smooth curving chains having an unbroken line of double stitches showing on the front side. So, probably rarely used, but there was interest so I made this video!

It's really just like the normal (front side) method of the CWJ, but reversed. Up where there was down, etc.

YouTube told me that my first CWJ video (the "front side" one) was made 10 years ago. Great Scott! Has it really been that long?

Wednesday, November 3, 2021

Knit sweater progress and CWJ thinking


The sweater has reached the stage of stitch holders for the front sections while continuing to knit the back. In the photo it's with some new fabric that I purchased to sew a skirt. Included is the Shell Pendant from my Craftsy class and here's the reason I have it out (other than it coincidently does look good with the future ensemble!)

Someone asked for instructions on tatting the shell so that it would face the opposite way. Well, the easiest is simply to tat it as written, then turn it over - but then it's back side up (which most people wouldn't really notice) but we tatters do notice the details, do we not?
So mostly, "back side" up tatting means making the double stitches in reverse order (2nd half first, 1st half second) but then we reach the Catherine Wheel Joins (CWJ) on the smooth outer curve. A recent search of the Internet didn't turn up instructions for tatting CWJ from the back side, so I guess I'll need to do a video of it myself. Let me know if someone else does have a tutorial for "Back side" CWJ! Anyway, it's been added to the to-do list.

Weaving has not progressed very far but here's a photo for those interested.

It's quite jazzy with all the colors and pattern jumbled up together; I like it! Also it's giving me more ideas!

On an unrelated note - literally a music note - I just found out the musician's concert seating for the December 1st concert of the community orchestra I play cello in. I've been assigned to first stand! (The first row of cellos nearest the conductor.) So, it means I had better not skimp on the practicing!!! Ah well, all this excitement keeps my mind occupied with good things.

Saturday, October 23, 2021

Weaving and knitting projects started


How long ago was the last time I prepared a warp for weaving? According to Google photos it was May, 2017, and it stayed on for 3 years. Well, since I only weave out of curiosity, there's no rush to finish, the discovery of "what happens if" is enjoyable in itself. I have not woven with Cottolin yarn (a blend of cotton and linen) before, but I love the bright colors, so this should be fun!


For those interested the loom I'm using is relatively small, a 24 inch wide 8 shaft table loom on a stand. I'm threading a pattern from page 39 in "A Weaver's Book of 8-Shaft Patterns" edited by Carol Strickler.  

Also I have started knitting a sweater, for myself. It's an open front cardigan with knitted lace edging designed by Bronagh Miskelly. The pattern is "Spring Leaf" found in Knitting Magazine, April 2017. The yarn I'm using is luxuriously soft, spun from Tibetan Yak hair. My first time using this fiber and I'm loving it! The color is Hokkaido, which is also the name of an island in the north of Japan. To me it looks like a medium toned, muted grayish purple.


Exploring other crafts is refreshing, and can spark new ideas for tatting, also. So do not worry that my tatting or hand dyeing will be neglected. In fact, I have a large batch of skeins already prepared for dyeing next week. The colorway will be "Stardate".

Tuesday, October 12, 2021

Tatting Encapsulation for Tiny Flowers


People have been asking about how I am tatting the tiny "flowers" that I've been putting onto my wire pendants. The flowers can be used in embroidery, too. So, here is a repeat of my encapsulation tutorial from July 31, 2017. 

The encapsulation technique for little flower motifs


You need at least 3 threads. For this demo I used a continuous multicolored thread on 2 shuttles plus a contrasting color on a 3rd shuttle. 


The threads can be knotted together, but I like to get started without a knot. I pick up one of the shuttles with the continuous thread, which is the color that I want for the rings (flower petals), and tat a Josephine ring (a ring made using the same half stitch repeatedly)

Note: I like to use the 1st half of the double stitch only, because it gives a tighter ring. But, the 2nd half of the double stitch can be used instead, for a looser look. The differing results are because the 1st half tightens the twist in the thread, the 2nd half loosens the twist. I usually put 9 to 14 half stitches in these rings, which must be closed carefully because the thread wants to kink.


After closing the ring, a short chain follows. Hold both of the continuous threads and the tail of the contrasting thread. The tail needs to be long enough to tension it along with the other threads for the multiple core of the chain. 

(Note: at some place along the "stem" of the flower motif the tail can be abandoned and cut off later. This is how I start the motif without a knot and no tails to sew in.)


 Wrap 1 unflipped double stitch over the multiple core threads. I used 2nd half first, 1st half second in this photo, which makes a downward facing curve.


Pick up the same shuttle that you used for the first ring to tat the next ring (the next "petal"). It is important to keep a main core thread sliding freely inside the chains for the flower, to be able to snug the flower up tightly when it's done. Only after the flower is closed, can any of the threads be used freely.


Follow each ring with an unflipped double stitch wrapped over the multiple core.


Use as many petals as you wish for the flower. Follow the last ring with 1 unflipped double stitch chain. Then, to close the flower and continue with a chain for the "stem", put the chain thread on top, leaving the multiple core threads below, between the 1st and 2nd rings.


Wrap unflipped double stitches for the "stem" chain. 
  • If you want the stem to curve upward, bring the wrapping thread under the multiple thread core, then tat first half, 2nd half. 
  • To curve the stem downward, leave the wrapping thread below the core and tat 2nd half, 1st half.

After a few stitches, pull the main core thread to tighten the flower. From time to time, also tug the other threads to keep everything nice and tight.


Continue in any way you wish, throwing off "leaves" and "buds" using any of the threads, adding more "flowers" as you like. 

To end off, the extra threads can be hidden inside the final rings, and the last ring can be a single shuttle split ring, leaving no tails to sew in. Have fun!

Tuesday, October 5, 2021

An Experiment with Bina's Layered Chain Technique


"Devotion" heart tatted with layered chains

This was the first time that I used Layered Chains in a finished project, and I wanted to learn how far I could push the limits of the technique.

The chains in 2 colors, layered on top of each other were tatted using Sabina Carden-Madden's technique of Layered Chains. This is a variation of pearl tatting technique that was published in the Winter 2006-2007 issue of "The Bulletin" by I.O.L.I (International Organization of Lace). 

The Layered Chains:

Fill 2 shuttles, each with a different color thread, and leave the thread attached to the balls.

Hold both ball threads for the core, same as for pearl tatting.
I used the light color for the bottom (inside chain), and the dark color for the top (outside chain). So, since I'm right handed, the light color (shuttle 1) was at my right hand, and the dark color (shuttle 2) to the left.


Tat a normal double stitch using ONLY the light color (bottom) core thread.


The double stitch is flipped as usual. I've shown only the first half in progress in the photo.


After each bottom double stitch, use shuttle 2 (dark thread) to wrap an unflipped double stitch over both core threads. I've shown only the first half in progress here. Notice that the top stitch (dark) is wrapping around both core threads, but NOT the shuttle 1 thread.

Continue alternating the bottom and top stitches in the same way. Both are 1st half, 2nd half as usual, but the top ones are unflipped. 

Count the stitches as usual, remembering to finish the same number of stitches each side.

To curve the chain, pull shuttle 1 only.


This is how the finished tatting looked before blocking. Very crowded and curled up, which is not the result I have when this design is made using normal tatting. So, I am thinking that it would be better to choose a pattern with more open space in it, to leave room for the bulkier layered chains.


I found that I like what I had considered the "back side" better than what I had thought would be the "front side"! Here are pictures of both sides. 


This Layered Chain technique is slow and requires concentration. I found it very fiddly at first. Eventually I was able to develop a sort of rhythm, if not speed. I enjoyed seeing the results!


Monday, September 20, 2021

Wire Mood


The wire has been brought out of the cupboard again, after several months of waiting while I attended to other projects. Always I feel as though I'm "breaking the rules" (rules? It's art!) and I guess that's why I enjoy it so much, LOL. 

Actually, I do follow a few basic rules (discovered through trial and error) to create a piece that will be beautiful for a long time. The most important: non tarnish wire! These pieces with fiber tatting wrapped in are not suitable for the usual wire jewelry finishing techniques of oxidation and/or polishing. I used to use Argentium silver sometimes, but no, no, it tarnishes to a horrible color, not the attractive dark gray of "antiqued" silver. It can be polished carefully with a cloth embedded with silver polish, but really that is no fun at all! I gave all my silver wire away. 


My basic process for my wire + tatting pendants is shown in this YouTube video I made https://youtu.be/eHRmMAvf1gU 

Each one always comes out different!


Tuesday, September 7, 2021

Lace necklace from "Victory" pattern


This lace necklace was inspired by a vintage collar pattern called "Victory". The thread I used was Lizbeth size 20 in Violet Pink Dark (for the center and the chains of the outer round) and for the rings on the edge I used my own hand dyed "Campfire".

Something I learned while tatting the clusters on the edge was that I needed to make my picots just slightly larger to allow the lace to lay flat. I didn't quite get that calculation of correct picot size to perfection, so there is still some slight "cupping" on the edges of this necklace but I'm very pleased overall.
The book I found the pattern in is called The Tatter's Treasure Chest which was published by Dover in 1990. On the copyright page there's a list of publications from the 1930s and 1940s that this collection was selected from. Another of the patterns in this book often seen tatted into necklaces is called "Pleasure Bent". It's a very similar design, but with rounded edges instead of points.
I used beading wire to string beads for the neck cord. Happily, enough coordinating colors of beads were found in my stash! However I did notice that I'm running low on jump rings, wire protectors, and other findings, so shopping will be necessary to replenish my supplies.

Wednesday, August 25, 2021

A new banner in my Etsy shop


To banner, or not to banner? Well, I'd gone without a banner in my Etsy shop for a long time, but after admiring the banners of some other Etsy sellers, I decided to put one together and upload it.

First, I had to learn what dimensions were required, and those numbers were discovered with some digging into the "Edit Shop" menu. 

1200 x 300 pixels minimum for a large banner, or 1200 x 160 pixels for a mini banner. As long as the same proportions are kept, the clarity is much better by uploading a larger image. My finished montage was 2400 x 600 pixels. Etsy automatically shrank the banner to fit into the allotted space.

So far, I like it! If I want to change it later, that's always possible, and now that it's been done before, it'll be easier next time.

Friday, August 20, 2021

Choose "Forgot Password"


When I've told interested tatters that the center of this necklace is the "Celtic Triangle" pattern from my "Next Steps In Shuttle Tatting" class, some of them have replied that they had a Craftsy account in the past but can't log in to the newer site that set up in 2020. Here's the fix:

Go to www.craftsy.com and select the log in icon in the upper corner (it looks like the outline of a head).
Fill in the email address that you used for the previous Craftsy or Bluprint website.
Then, select "Forgot Password". (Do not put in your old password, it won't work. You have to reset your password this first time.)

They'll send you an email with instructions to reset your password. After that's done you will have access to all the classes that you had purchased in the past!

If you still are having trouble logging in, email craftsy@program-director.net and they will help you solve any problems you may have.


Okay, so that's how to get the pattern for the center, which is finished as a pendant in my original design. The rest is just experimentation, each time it is slightly different. Just having fun!


Thursday, July 22, 2021

Beading with Tatting, Color and Roses


Work in progress: tatting with beads, beading around 8mm beads, and a retake on a previous design in peppermint green.


This beading is peyote stitch, using a doubled thread as shown in the 2nd photo. I've been using 6 lb. "Fireline" thread but have observed that it's a bit thick to use doubled with the size 11/0 Delicas beads and tiny size 15/0 seed beads that I'm working with. So have placed an order for 4 lb. Fireline to use in the future. Oh, and if you are looking for a tutorial, I'm following the top bead design shown by Viktoriya Antipova in her YouTube video here: https://youtu.be/m7oqEBAxhEI?t=1679 And it would be nice to support her by giving her video a "like".


Last weekend was a classic car show and I fell in love with all the aqua and teal colors I saw! So, having realized that I've never done a dye batch completely of aqua shades, that's definitely on the to-do list. (^^ )

The Peace rose that I had been using in photographs up to now was one I had seen at the Boerner Botanical Gardens. But theirs died, so since I really need a Peace rose in my life I bought one and planted it in my own garden. So here's a photo of its 3rd rose produced this summer!


Now that I've learned a little bit about roses (I was clueless!) now I have a deeper appreciation for the "faithfully blooming every summer for 22 years" red rose given to me by my mother. 

I don't know the name of this rose, but with the help of a rose expert friend, we've decided that it's a beautiful red rose! (And the inspiration for my original "Roses" batch of hand dyed thread.)