Showing posts with label flowers. Show all posts

Saturday, February 3, 2024

Dragon and flower and towels and more


It was fun making this dragon bookmark designed by GaliciaBee! Her bobbin lace patterns are beginner friendly and are an excellent way to learn basic bobbin lace techniques.

Because I still need step-by-step guidance with bobbin lace, I also purchased GaliciaBee's Dragon 1 Video Course and followed her demonstration while making my dragon. 

Wow, wow, wow!!! I love the tatted flower pattern "Broosh Karen" from FairyLace. I chose colors that remind me of springtime for my brooch. It's a challenging pattern for advanced tatters. This project certainly provides plenty of practice with using a picot gauge. 

These colorful tea towels (aka bar mops, artsy rags) were all woven from the same warp. Finished after 2 years on the loom, since I don't weave very often.

An example showing 2 different brands of thread that were both labeled "size 10". Yes, both in the same pattern (my own "Duchess" necklace from "Boutique Tatting". The green was Hakelgarn brand, the black is Lizbeth. Well, fortunately the pattern still works with the larger thread, though I replaced the 2mm beads with large hole rondelles.

Finished a bracelet from my own "Heart Aglow" pattern in hand dyed thread. This item has been listed for sale in my Etsy shop here.


Saturday, October 8, 2022

Spooky and more dyes


A new batch of "Spooky" hand dyed thread has just been listed in my Etsy shop. 

I noticed that some of the dyes in my stash were running low, so placed an order to restock. I only use fiber reactive dyes for cotton to dye my hand dyed thread. Here's some of the vendors that I buy dye from:
Just posting free advertising for them here because they are good vendors with quality supplies that I've purchased from for many years. 
_______

Weather here is beginning to get very cold at night, close to freezing, but not yet. Here's some pictures of fall blooming flowers from my own garden.

Autumn blooming crocus "Colchicum Autumnale"

Phlox "Blue Boy" (mine isn't blue because of the soil PH but I like the color it is!)


Thursday, July 14, 2022

"Misty Morning" hand dyed batch


New batch of hand dyed thread "Misty Morning" is now listed in my Etsy Shop. Shaded blues going into purple with a touch of straw yellow are in this, and I'm really pleased with the result. 


The flower pictures are of the same rose, showing it partially open after a late afternoon rain shower and then fully open in morning sunshine. It's a "Charles Darwin" rose, one of the David Austin hybrids. Planted on June 26, it's a very young plant, so I was thrilled to see it bloom so quickly! This season I also planted another David Austin hybrid called "Heritage" and a new "Peace" rose which has several buds on it. More color inspirations!

Tuesday, October 12, 2021

Tatting Encapsulation for Tiny Flowers


People have been asking about how I am tatting the tiny "flowers" that I've been putting onto my wire pendants. The flowers can be used in embroidery, too. So, here is a repeat of my encapsulation tutorial from July 31, 2017. 

The encapsulation technique for little flower motifs


You need at least 3 threads. For this demo I used a continuous multicolored thread on 2 shuttles plus a contrasting color on a 3rd shuttle. 


The threads can be knotted together, but I like to get started without a knot. I pick up one of the shuttles with the continuous thread, which is the color that I want for the rings (flower petals), and tat a Josephine ring (a ring made using the same half stitch repeatedly)

Note: I like to use the 1st half of the double stitch only, because it gives a tighter ring. But, the 2nd half of the double stitch can be used instead, for a looser look. The differing results are because the 1st half tightens the twist in the thread, the 2nd half loosens the twist. I usually put 9 to 14 half stitches in these rings, which must be closed carefully because the thread wants to kink.


After closing the ring, a short chain follows. Hold both of the continuous threads and the tail of the contrasting thread. The tail needs to be long enough to tension it along with the other threads for the multiple core of the chain. 

(Note: at some place along the "stem" of the flower motif the tail can be abandoned and cut off later. This is how I start the motif without a knot and no tails to sew in.)


 Wrap 1 unflipped double stitch over the multiple core threads. I used 2nd half first, 1st half second in this photo, which makes a downward facing curve.


Pick up the same shuttle that you used for the first ring to tat the next ring (the next "petal"). It is important to keep a main core thread sliding freely inside the chains for the flower, to be able to snug the flower up tightly when it's done. Only after the flower is closed, can any of the threads be used freely.


Follow each ring with an unflipped double stitch wrapped over the multiple core.


Use as many petals as you wish for the flower. Follow the last ring with 1 unflipped double stitch chain. Then, to close the flower and continue with a chain for the "stem", put the chain thread on top, leaving the multiple core threads below, between the 1st and 2nd rings.


Wrap unflipped double stitches for the "stem" chain. 
  • If you want the stem to curve upward, bring the wrapping thread under the multiple thread core, then tat first half, 2nd half. 
  • To curve the stem downward, leave the wrapping thread below the core and tat 2nd half, 1st half.

After a few stitches, pull the main core thread to tighten the flower. From time to time, also tug the other threads to keep everything nice and tight.


Continue in any way you wish, throwing off "leaves" and "buds" using any of the threads, adding more "flowers" as you like. 

To end off, the extra threads can be hidden inside the final rings, and the last ring can be a single shuttle split ring, leaving no tails to sew in. Have fun!

Thursday, July 22, 2021

Beading with Tatting, Color and Roses


Work in progress: tatting with beads, beading around 8mm beads, and a retake on a previous design in peppermint green.


This beading is peyote stitch, using a doubled thread as shown in the 2nd photo. I've been using 6 lb. "Fireline" thread but have observed that it's a bit thick to use doubled with the size 11/0 Delicas beads and tiny size 15/0 seed beads that I'm working with. So have placed an order for 4 lb. Fireline to use in the future. Oh, and if you are looking for a tutorial, I'm following the top bead design shown by Viktoriya Antipova in her YouTube video here: https://youtu.be/m7oqEBAxhEI?t=1679 And it would be nice to support her by giving her video a "like".


Last weekend was a classic car show and I fell in love with all the aqua and teal colors I saw! So, having realized that I've never done a dye batch completely of aqua shades, that's definitely on the to-do list. (^^ )

The Peace rose that I had been using in photographs up to now was one I had seen at the Boerner Botanical Gardens. But theirs died, so since I really need a Peace rose in my life I bought one and planted it in my own garden. So here's a photo of its 3rd rose produced this summer!


Now that I've learned a little bit about roses (I was clueless!) now I have a deeper appreciation for the "faithfully blooming every summer for 22 years" red rose given to me by my mother. 

I don't know the name of this rose, but with the help of a rose expert friend, we've decided that it's a beautiful red rose! (And the inspiration for my original "Roses" batch of hand dyed thread.)


Sunday, July 12, 2020

Double Flower Celtic


My video demo of this tatted flower is now on YouTube https://youtu.be/gn5G3aeHesg 


There's a left handed video there too, but I am not ambidextrous! I simply use an app to flip the video mirror image. Here's the left handed link: https://youtu.be/A8SWcA0BCMQ


This simple design originally appeared in 2013 in this blog post: https://yarnplayertats.blogspot.com/2013/07/double-flower-using-celtic-shuttle.html 


By the way, since I sometimes get asked: 
No, there will NOT be a needle tatted version, since needle tatting really isn't my thing. But needle tatters can absolutely tat this pattern using the tatting techniques that correspond to your tool.

Have fun tatting and stay safe!


Thursday, April 18, 2019

Spring Corsage in 3D Tatted Flowers

 My spring corsage is done, just in time for Easter! I used the daffodils tatting pattern in Christel Weidmann’s book "Ostern" plus small tatted flowers I made up myself.

I really like how Christel's 3D daffodil design imitates the live flower so well. The book is written in German, with a list of the tatting abbreviations translated into English. There are about 15 designs in the book, including several animals and flowers, each with a diagram and stitch counts. The daffodils are the only 3D patterns in this book. The larger daffodil has more detailed instructions than the smaller narcissus, so I'd recommend trying the large daffodil first. (I started with the narcissus and had a bit of trouble, but eventually sorted it out!)

I used size 20 thread (Lizbeth, mostly) for finished flowers that measured about 2 inches (5 cm) across. After that I tatted small flowers (to suggest scilla and violets), finishing each with a tiny single shuttle split ring at the bottom so I wouldn't have to sew in ends. When all the flowers were done, I joined them together with lock stitch tatted chain. The joining was not an exact science - I just made it up while going along until I had an arrangement I liked.

I'll wear it using a corsage pin, just as if they were real flowers!

Connecting the flowers into an arrangement

Joining the cup of a tatted daffodil in progress

The book "Ostern" by Christel Weidmann

Saturday, March 30, 2019

Freshly dyed thread "Corsage" purple and orange


Hand dyeing in progress
The colors were inspired by a Cattleya orchid, which I think would make a stunning corsage for a special occasion, hence the name Corsage. Several sizes of cordonnet thread and embroidery floss now listed in my Etsy Shop.


I haven't had much time for tatting lately, since I've been very busy practicing music. I'll be playing my cello in a Wisconsin Intergenerational Orchestra concert on May 5 and still have lots to prepare! Also, I sing in the church choir + some cello there too, and Easter will be here soon.

I did make a start on tatting a daffodil from the book Ostern - Easter Motives by Christel Weidmann. The plan I have in mind is adding some leaves along with other tiny flowers to make a ... (you guessed it) ...corsage!
Tatting a daffodil in progress

The book Ostern - Easter Motives by Christel Weidmann.

Wednesday, August 6, 2014

Flowers in thread, coming events

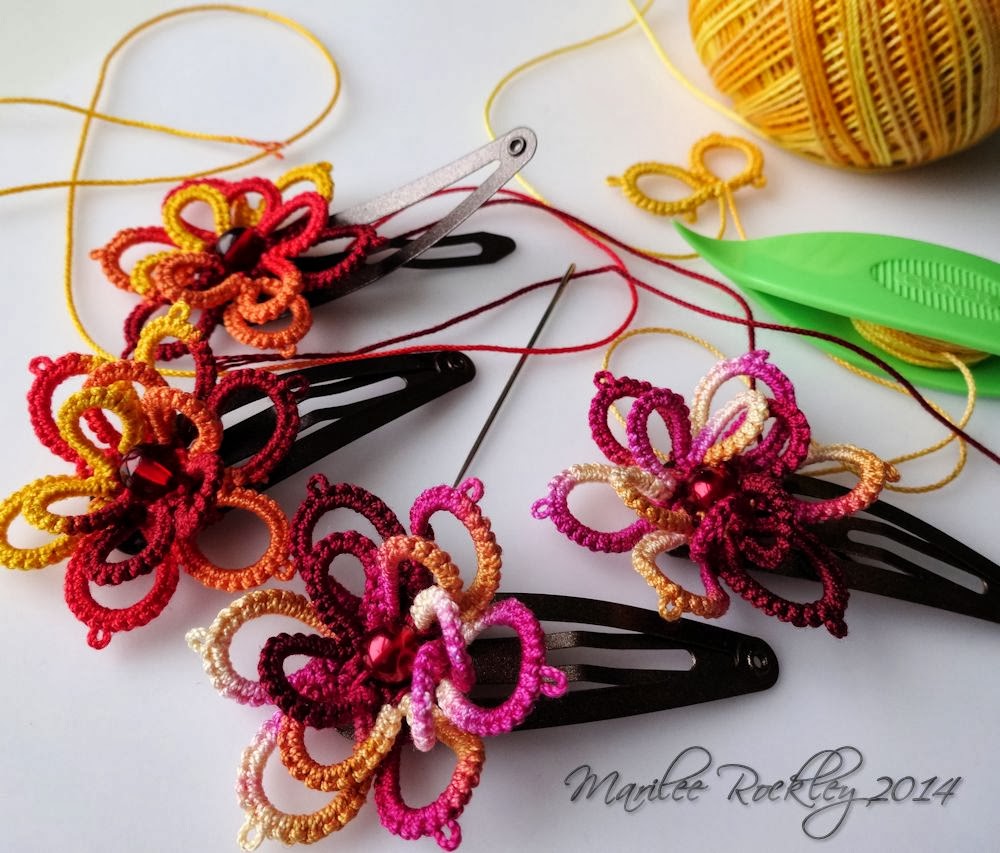
 Flower necklace in progress, with hand dyed threads. New batch of "Peace" thread will be listed by tomorrow. The pattern is in this book.
 Colors of hand dyed thread you may have missed, inspired by flowers.
I submitted a tatted jewelry set pattern to Belle Armoire Jewelry magazine, and have received a reply saying it will appear in the Winter issue, unless they decide to save it for a later issue.

My beginner level tatted earrings class proposal for the Bead&Button Show has been submitted, but I won't hear if it has been accepted for the show until November, since they receive many, many submissions. I do have another project in the works for the Bead&Button Show auction: a collaborative effort with a wire jewelry artist. She is making the wire parts of a series of earrings, and I am making the tatted parts. More on that later.

This coming Monday, August 11, will be the next meeting of the Greater Milwaukee Tatting Guild. Also, rumor has it that the Tollway Tatters will be meeting the following day. If so, I'll be bringing cake. Not saying why :-x

Saturday, February 8, 2014

Bright greens


New batch of hand dyed thread, Bright Greens. The flower hairclip is tatted from the same thread.

A reminder that I hand dye in small batches, and preparation begins with winding the thread into skeins. For those who aren't familiar with the word, skeins are big circles of thread, a form that prevents tangling and provides maximum surface area so the dye can reach all of the thread.

Then, I prepare the dye, and paint it onto the thread using a brush. I wrap it in plastic and let it "cure" (the thread and dye react together for a while). Then, I rinse the thread, let it dry, and twist the skeins so they'll look pretty to sell.

Since it's just me doing all the work, each batch is small, unique, and when it's gone...it's gone.


Tuesday, February 4, 2014

Hair clips, feathers, boomerangs

 Currently I'm in a hair clip frenzy. First off, I should mention that the flower design for these hair clips is NOT in any of my books. But, similar 3D tatted flower patterns are pretty common on the Internet, so you don't have to wait to get started on your own tatted flowers, should seeing this photo awaken a frenzy within you as well :) 

The flowers nearest the front are in my own hand dyed from the "Roses" batch, the ones to the left are in Lizbeth #100, and the yellow that I've started in the back is Lizbeth #180, all are size 10.
 Eventually this pair of tatted yellow feather earrings will be done! The feather pattern IS in my latest book, "Marilee's Beaded Tatting Finery", although this yellow pair in progress is an elongated version of the book's pattern.
The boomerang pattern is in the book as well. This is a recently completed pair of earrings that's listed in my Etsy Shop.

Hand dyed thread is always on my to-do list, and since I will be moving on to shamrocks very soon, I expect that some greens will be needed!

Wednesday, March 27, 2013

The frog necklace idea didn't work, so I made this instead


 This asymmetrical necklace uses the bits I was going to put into my original frog necklace idea, which I abandoned after seeing that the frog was just too big and heavy to balance in a necklace. I do like the simpler necklace that resulted, though, it has a bold steampunk/industrial chic look. Working with size 3 Lizbeth thread is a little outside of my "comfort zone", since I have to use a larger shuttle and more physical strength to tat it. I like my knots/double stitches firm and tight, so with the size 3 it takes harder pulls to get them the way I want. Normally my favorite thread sizes for tatting jewelry are 10 and 20, with 20 being the easiest to work with.

The frog in size 3 really is a nice size closure for a jacket or cardigan, though, so I will offer it for sale simply as a frog. By the way, the pattern for the frog (in size 20 thread) is in "Up and Tat 'Em". The only change I made to the pattern when using size 3 is the size of the button, I used a 7/8" (22mm) button with the size 3 thread.


 I'm planning how to display my items on my table in the Maker's Fair at Concinnity. I always demonstrate while I sell, and hope to get more people interested in the new Greater Milwaukee Tatting Guild. I'll be handing out flyers!